No other place in your home is abused like the floor of your basement. It is concerned with the moisture, heavy foot traffic, dropped tools and changes in temperatures throughout the year. The majority of the homeowners do not give it a second thought until something goes bad.
But the finish on the right makes it all. It keeps your slab safe, cleans the place easier and transforms a gray and boring area to one you can be proud of. You can be completing a laundry room project, or a home gym, or a complete living space and this guide takes you through all of the options in a straightforward and truthful manner.
In case you happen to be in Woodland Park, NJ, you are well aware of how bitter winters and damp springs are to below-grade concrete. That wetness does not simply evaporate it seeps through your slab and destroys the cheap finishing on the inside and out.
That is why it is important to pick a good finish at the very beginning. People who are looking to get the services of the reputable basement flooring company are not always aware of the extent to which the pre-work and the choice of products can influence the outcome. It is more expensive to do it the first time than to do a beautiful finish which fails in two years.
This guide will have all this information including how to read your slab condition to the correct system to use, its application and how to maintain that system to ensure that it remains presentable over the years.
Why Basements Are Different
The basements are not a room like any other room. They are also lower than grade and thus it puts pressure of the moisture on all sides. The slab is laid on the soil directly. There’s less airflow. The alterations in temperature are normal.
Normal floor finishing was not planned to accommodate such cases. Good finishes are performance-based finishes. They are made to be attached with moisture, fight the chemical as well as aid in the actual use.
This is a guideline to the house owners and the constructors. It is the basis of your smarter choices before you can spend a penny on materials.
What “High Performance” Actually Means
A high-performance finish isn’t just about looks. It has to:
- Bond tightly to the concrete
- Resist moisture vapor from below
- Handle impact without chipping
- Stay looking clean year after year
Not every product on the shelf delivers that. This guide helps you tell the difference.
Understanding Basement Concrete Conditions
Before you pick a finish, you need to understand what you’re working with. Skipping this step is the number one reason basement floor projects fail.
A. Moisture and Vapor Transmission
Concrete is porous. It absorbs and releases moisture constantly. This movement called vapor transmission can push coatings off the slab if you don’t account for it.
How to test for moisture:
- Use a calcium chloride test kit (ASTM F1869 standard)
- A digital RH (relative humidity) probe is more accurate for thick slabs
- Leave plastic sheeting taped to the floor for 24–48 hours condensation underneath means you have a problem
What’s acceptable?
- Epoxy: moisture vapor emission under 3 lbs per 1,000 sq ft per 24 hours
- Polyurethane: typically more forgiving, up to 5 lbs
- Polished concrete epoxy basement floor cost: handle higher moisture levels when densifiers are used correctly
Don’t skip this test. In Woodland Park, NJ, seasonal groundwater fluctuations make moisture testing especially important. Many basements here show elevated readings in spring and early summer.
B. Slab Condition Assessment
Walk your slab carefully before doing anything else. Look for:
- Cracks — hairline cracks are normal; wide or moving cracks need repair first
- Spalling — surface flaking means the top layer is weak and needs to be ground down
- Pitting — small holes that need to be filled before any coating is applied
- Levelness — use a straightedge; dips over 3/16 inch per 10 feet affect overlay systems
Photograph what you find. It helps if you’re hiring a contractor — they’ll know exactly what they’re dealing with before they quote you.
C. Existing Coatings and Contamination
Was paint, sealer, or a previous coating applied to the floor? It needs to come off. Most high-performance systems won’t bond to existing coatings.
Signs of contamination:
- Water beads on the surface (sealer or oil present)
- Discoloration or staining from old paint
- Sticky or tacky spots
Use a scraper or shot blaster to remove old coatings. Then do a simple water drop test if water absorbs into the slab in under 30 seconds, the surface is ready to accept a coating.
D. Structural Concerns
If your slab has deep cracks, significant settlement, or structural movement stop. No coating fixes a structural problem. Get an engineer or structural contractor involved before you apply anything.
III. Surface Preparation
This is the most important part of any floor finish project. Prep determines whether your finish lasts 3 years or 15. There are no shortcuts here.
A. Cleaning and Degreasing
Start with a thorough mechanical sweep and vacuum. Then degrease with a pH-neutral cleaner or a commercial concrete degreaser. Oil contamination from vehicles or machinery is common in garage-adjacent basements treat it aggressively.
B. Mechanical Preparation Techniques
The goal is to open the concrete’s pores and create a surface profile that the coating can grip.
Shot blasting is the most effective method for large areas. It removes surface contaminants and creates a consistent profile. It’s fast, clean, and produces minimal dust.
Diamond grinding is better for smaller areas and spot prep. It’s the right tool when you need to knock down high spots or remove stubborn coatings.
Scarifying and milling are used for heavy-duty removal thick paint layers, failing overlays, or heavily contaminated surfaces. They’re aggressive, so use them only when needed.
C. Crack Repair and Patching
Fill cracks with a rigid polyurea joint filler or an epoxy injection system for structural cracks. Don’t use regular caulk — it’ll flex and push the coating off.
For spalled or pitted areas, use a polymer-modified concrete patching compound. Let it cure fully before applying any topcoat.
D. Moisture Mitigation Systems
If moisture testing reveals high vapor emission, apply a moisture mitigation primer before your main coating. Products like epoxy moisture-tolerant primers or waterproof membranes create a barrier between the vapor and the finish coat.
In Woodland Park, NJ, this extra step is worth the cost. It’s far cheaper than tearing out a failed floor system a year later.
E. Surface Profile Standards (CSP)
The International Concrete Repair Institute (ICRI) uses a scale from CSP 1 to CSP 9 to classify surface roughness. Most floor coating systems require:
- CSP 2–3 for thin coatings and sealers
- CSP 3–5 for epoxy and polyurethane systems
- CSP 5–7 for heavy broadcast or mortar systems
Match your surface profile to your chosen system. The manufacturer’s data sheet will specify the requirement.
Types of High Performance Concrete Floor Finishes
Here’s where you choose your finish. Each system has strengths, weaknesses, and a specific range of applications. Pick based on how you actually use the space.
A. Polished Concrete
Polished concrete is a mechanical process — not a coating. Diamond tooling progressively refines the slab surface to a smooth, reflective finish.
The process:
- Start with coarse diamond segments (16–30 grit)
- Work up through the grits (80, 150, 400, 800, 1500, 3000)
- Apply a chemical densifier mid-process to harden the surface
- Finish with a penetrating guard or stain protector
Sheen levels:
- Matte (400 grit): Low shine, hides surface imperfections well
- Satin (800 grit): Balanced look, good for residential use
- High-gloss (1500–3000 grit): Mirror-like surface, shows everything
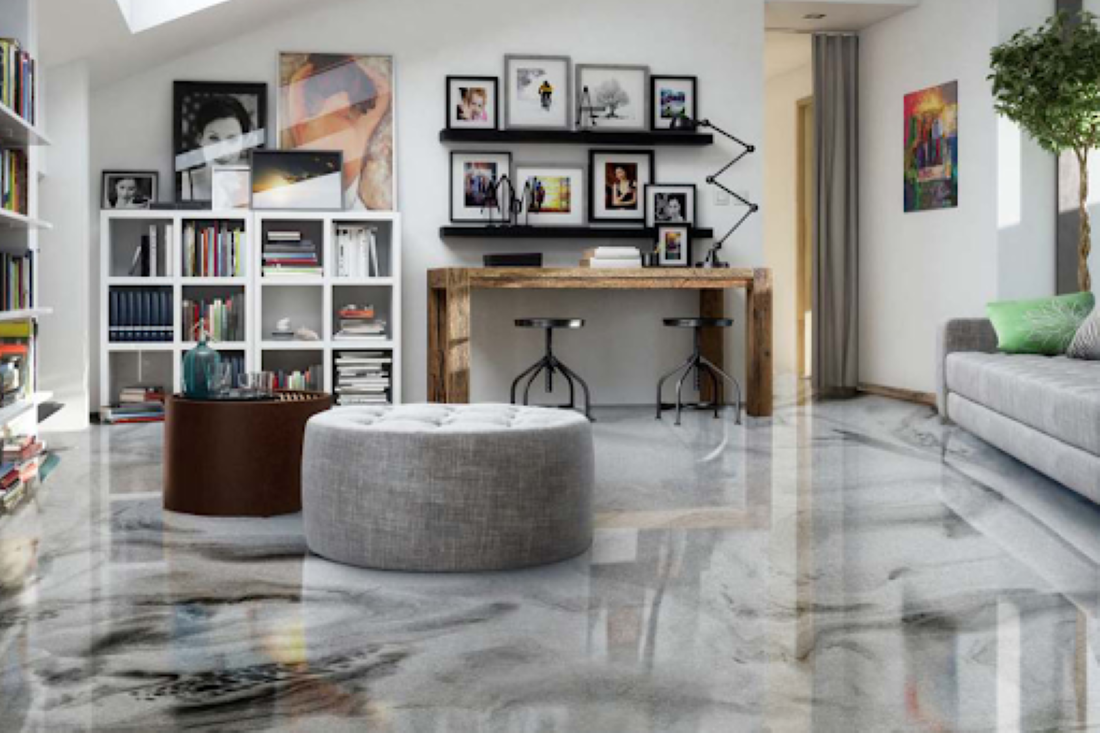
Polished concrete is durable, easy to maintain, and looks genuinely upscale. It works well for finished basements used as living areas, home offices, or studios.
Limitation: It doesn’t add a moisture barrier. High-vapor slabs need mitigation before polishing.
B. Epoxy Coatings and Systems
Epoxy is the most popular high-performance basement floor system and for good reason. It bonds hard to concrete, resists chemicals, and comes in dozens of colors and finishes.
Before we talk systems, here’s what homeowners often search for: epoxy basement floor cost typically ranges from $3 to $12 per square foot installed, depending on the system, surface condition, and number of coats. DIY kits run lower, but professional installation gives you a far better result on problem slabs.
100% Solids Epoxy is the strongest option. No water, no solvents — just pure resin. It’s thicker, more durable, and better for high-traffic or commercial-grade basements. It requires proper temperature and humidity control during application.
Water-based epoxy is easier to apply and has lower VOCs. It’s a good choice for DIYers or for spaces that need to be back in use quickly. Durability is lower than 100% solids.
Self-leveling epoxy flows across the floor and self-smooths to a glassy finish. It’s great for decorative applications but requires a very flat substrate.
Epoxy mortar systems are the toughest option available. They combine epoxy with sand or aggregate to create a thick, impact-resistant surface. Ideal for workshops, utility areas, or anywhere heavy equipment lives.
Epoxy broadcast systems scatter decorative chips or quartz into a wet epoxy base coat, then seal with a topcoat. They look great, add texture (which means slip resistance), and are very forgiving of minor slab imperfections.
C. Polyurethane and Polyaspartic Topcoats
These are usually applied over epoxy base coats as a protective topcoat — not as standalone systems.
Polyurethane is UV-stable and chemical-resistant. It flexes slightly, which helps it survive thermal movement. It’s the right topcoat for basements with temperature swings.
Polyaspartic cures very fast — sometimes in under an hour. That’s great for minimizing downtime. It’s also extremely abrasion-resistant and handles UV exposure better than epoxy. The tradeoff is a shorter working time during application.
D. Microtopping and Concrete Overlay Systems
Microtoppings are thin (1–3mm) cement-based overlays applied over existing concrete. They give you a fresh, designer surface without replacing the slab.
They’re ideal when:
- Your slab is structurally sound but cosmetically damaged
- You want a specific color or texture that polished concrete can’t achieve
- You’re working in a finished basement where grinding is impractical
Overlays require very good prep and a flexible topcoat to prevent cracking. Don’t skip the primer coat.
E. Stained and Dyed Concrete
Acid staining reacts chemically with the concrete to produce earthy, variegated tones — browns, tans, and terra cotta shades. No two floors look exactly the same. The result is permanent — it won’t peel or fade.
Water-based staining gives you more color options, including grays, blues, and greens. It’s more predictable than acid staining and easier to apply.
Acetone dyes penetrate deeply and produce vivid, consistent color. They’re typically used under a clear topcoat for protection.
Staining is a decorative option, not a protection option. Always seal stained concrete with a polyurethane or polyaspartic topcoat to protect the color and the surface.
F. Flake and Quartz Broadcast Systems
This is probably the most popular finish for residential basements right now. Full-flake epoxy systems look great, hide imperfections, and are extremely durable.
How they work:
- Apply a pigmented epoxy base coat
- Broadcast vinyl flake chips to full saturation (cover the entire floor)
- Scrape off excess chips once cured
- Apply one or two clear polyaspartic topcoats
The result is a durable, attractive floor that looks similar to high-end commercial finishes. Quartz systems work the same way but use finer aggregate the result is smoother and more uniform.
Performance Properties and Selection Criteria
Once you’ve narrowed down your options, compare them across these key performance categories.
A. Abrasion and Impact Resistance
For workshops and utility areas, prioritize epoxy mortar or full-broadcast systems. For finished living areas, polished concrete or microtopping with a polyaspartic topcoat works well.
B. Chemical and Stain Resistance
100% solids epoxy and polyurethane-topped systems resist oils, cleaners, and most household chemicals. Acid stains and unsealed polished concrete are more vulnerable — always add a topcoat.
C. Slip Resistance and Safety
Glossy finishes can be slippery when wet. Add slip-resistant aggregate to your topcoat if the basement is used by kids, older adults, or in areas that may get wet (laundry rooms, bathrooms).
D. Thermal and Moisture Cycling
Basements in Woodland Park, NJ, go through significant temperature changes seasonally. Flexible topcoats like polyurethane handle this better than rigid epoxy alone. This is why a two-coat system (epoxy base + polyurethane or polyaspartic top) is the standard for most high-quality installs.
E. Light Reflectivity and Aesthetics
High-gloss finishes reflect light and can make a basement feel larger and brighter. This is worth considering in lower-ceiling basements where natural light is limited.
F. Cure Times and Re-entry Schedules
- Water-based epoxy: light foot traffic in 12–24 hours
- 100% solids epoxy: 24–72 hours for foot traffic, 5–7 days for full cure
- Polyaspartic: foot traffic in 1–4 hours, full cure in 24 hours
- Polished concrete: usable immediately after final pass
Plan your project timeline around these windows. Don’t rush cure time — it’s where most DIY failures happen.
Application Process by Finish Type
A. Step-by-Step Guidelines
Every system has its own application sequence. Follow the manufacturer’s technical data sheet exactly. Don’t substitute products between brands they may not be chemically compatible.
General sequence for epoxy broadcast system:
- Complete all surface prep (grinding, patching, priming)
- Apply moisture mitigation primer if needed — allow full cure
- Apply pigmented epoxy base coat — work in sections
- Broadcast vinyl flake chips while base coat is still wet
- Allow full cure (24–48 hours minimum)
- Scrape off loose chips, vacuum thoroughly
- Apply first clear polyaspartic topcoat
- Allow cure, then apply second topcoat if specified
- Allow full cure before furniture or vehicle use
B. Equipment and Tooling
- Floor grinder with diamond tooling (rental available at most equipment rental shops)
- Spike roller for epoxy application
- Squeegee and notched trowel for self-leveling systems
- Chip flake hopper or hand broadcasting for broadcast systems
- HVLP sprayer for polyaspartic topcoats (optional but gives a better finish)
C. Environmental Conditions
Temperature and humidity are critical. Most epoxy systems require:
- Air and slab temperature between 50°F and 90°F
- No application within 5°F of the dew point (condensation risk)
- Relative humidity below 85% during application and cure
Check conditions before you start. A cold, humid morning in Woodland Park, NJ can ruin an application even if you did everything else right.
D. Mixing Ratios and Pot Life
Two-part epoxy systems have strict mixing ratios — usually 2:1 or 3:1 by volume. Always mix by ratio, not by eye. Use a drill mixer at low speed to avoid introducing air bubbles.
Pot life (the working time after mixing) is typically 20–45 minutes for 100% solids epoxy. Work quickly and in manageable sections. Don’t try to mix too much at once.
E. Common Application Mistakes
- Skipping moisture testing — the #1 cause of delamination
- Under-preparing the surface — coatings fail from the bottom up
- Applying in the wrong temperature or humidity — results in fisheyes, blushing, or poor adhesion
- Not allowing proper cure time — leads to surface damage before the coating reaches full hardness
- Mixing partial kits — always mix full units to maintain correct ratios
Maintenance and Long-Term Care
The right finish doesn’t just look good on day one. With proper maintenance, it looks good on year ten too.
A. Routine Cleaning
- Sweep or vacuum weekly to remove grit (grit is abrasive and wears topcoats over time)
- Damp mop with a pH-neutral floor cleaner
- Avoid bleach-based cleaners on epoxy — they dull the surface over time
- Clean spills quickly, especially on stained concrete systems
B. Re-sealing and Topcoat Refresh
Polyaspartic and polyurethane topcoats wear over time in high-traffic areas. Expect to reapply a topcoat every 5–10 years depending on use.
The good news: refreshing a topcoat is much cheaper and faster than installing a new system. Light scuff-sanding and a fresh coat is usually all it takes.
C. Repairing Chips and Delamination
Small chips in epoxy systems can be repaired with a color-matched patch kit. Delamination (sections lifting away from the slab) usually indicates a moisture problem — fix the source before patching.
Large-scale delamination means the coating needs to be removed and reapplied after addressing the root cause.
D. Expected Service Life by Finish Type
| Finish Type | Expected Life (with proper maintenance) |
| Polished Concrete | 20+ years |
| 100% Solids Epoxy + Polyaspartic | 10–15 years |
| Water-based Epoxy | 5–7 years |
| Microtopping + Polyurethane | 10–15 years |
| Acid Stain + Sealer | 5–10 years (resealing required) |
| Flake Broadcast System | 10–15 years |
Cost Analysis and Project Budgeting
A. Material Costs by Finish System
Ballpark ranges for materials only (per square foot):
- Water-based epoxy: $0.50–$1.50
- 100% solids epoxy: $1.50–$4.00
- Polished concrete (densifiers, guards): $0.75–$2.00
- Microtopping systems: $2.00–$5.00
- Full-flake broadcast system: $1.00–$3.00
B. Labor and Equipment Costs
Professional installation in the Woodland Park, NJ area typically runs:
- Basic epoxy coating: $3–$6 per square foot installed
- Full-flake broadcast system: $4–$8 per square foot installed
- Polished concrete: $3–$8 per square foot installed (depends on grit level)
- Microtopping systems: $6–$12 per square foot installed
These numbers include prep, materials, and labor. Always get 2–3 quotes from local contractors.
C. DIY vs. Professional Installation
DIY is realistic for water-based epoxy and basic staining. It’s not recommended for:
- 100% solids epoxy systems (tight working window, mixing precision required)
- Polished concrete (requires renting or buying specialized equipment)
- Moisture mitigation systems (requires correct product selection and application technique)
If your slab has significant issues — high moisture, structural cracks, heavy contamination — hire a professional. The cost of a failed DIY is always higher than the cost of getting it right the first time.
D. ROI and Property Value
A well-finished basement floor adds real value. Finished basements routinely add $15,000–$40,000 to home resale value, depending on the market. The floor finish is a visible part of that equation.
In the Woodland Park, NJ real estate market, finished basements are a meaningful selling point. Buyers notice the floor. A polished or full-flake finish signals quality.
Safety, Health, and Environmental Considerations
A. VOC Content
Solvent-based epoxies and polyurethane topcoats contain volatile organic compounds (VOCs). Work in a well-ventilated space. Open windows and run fans during and after application.
Water-based systems have significantly lower VOCs. If you’re sensitive to chemicals or working in a tight space, choose a low-VOC product.
B. Respiratory and Skin Hazards
Wear proper PPE:
- Nitrile gloves (not latex) during mixing and application
- Safety glasses or goggles
- Organic vapor respirator (not a dust mask) for solvent-based systems
- Knee pads and spiked shoes for walking in wet epoxy
Uncured epoxy can cause skin sensitization with repeated exposure. Don’t take shortcuts with PPE.
C. Waste Disposal
Mixed epoxy left in the bucket will cure on its own let it harden fully, then dispose of it as solid waste. Don’t pour uncured epoxy down drains. Check local guidelines in Bergen County, NJ for specific disposal rules.
D. Eco-Friendly Options
Several manufacturers now offer bio-based epoxy systems with recycled content and lower environmental impact. Water-based polyurethane topcoats are another lower-impact choice. Look for products with GreenGuard certification if indoor air quality is a priority.
Conclusion
There is nothing complex in selecting the appropriate finish to your basement floor, but only sincere evaluation and planning are necessary.
Start with your slab. Know its moisture content, state and the contamination present. First prepare the system, and then prime, then paint.
Make the finish correspond to your real use of the space. A home gym or a guest bedroom is not what a workshop requires. Never put too much engineering into a small utility space, and never put too little engineering in an area you are actually living in.
The local climate should be considered by the homeowners of Woodland Park, NJ. Product selection depends on the seasonal moisture, freezing temperatures, and humidity of summer months, which also influence the long-term product performance.
Finishes included in this handbook are tested, readily available and applied by professionals and serious home-DIYers on a daily basis. The prep is a serious task and with the application instructions, your floor will be good and will last years.
 By
By
 By
By


 By
By